Build Notes

Name:
Location: Dunwich, MA

Sunday, April 23, 2006

Tenor #1: Neck, Part IX


Fingerboard
Originally uploaded by Usonian.
Once again I followed Siminoff's technique for attaching the fingerboard, by using two small nails as positioning pins to hold the fingerboard in place during clamping.

I think everything went well... now it's a matter of sanding, then sanding, then sanding some more.

Thursday, April 20, 2006

Tenor #1: Neck, Part VIII

While playing my 5-string banjo last night I noticed that the last inlay marker before the twelfth fret is at the tenth fret, not the ninth as I placed it on my fretboard. A Google Image search confirmed that the 10th fret is the typical place to put it.

It's a good thing I'm not planning on selling this particular instrument when it's finished. It's a detail that will always bug me a little bit, but not quite enough to throw out the fingerboard.

Postscript
While playing guitar tonight I noticed that the marker is indeed on the ninth fret. Interesting. I'll have to cross-reference tenor guitars and mandolins too.

Wednesday, April 19, 2006

Tenor #1: Neck, Part VII


Tenor #1: Profiled Fingerboard
Originally uploaded by Usonian.
Although I saved about thirteen bucks by buying a rosewood guitar fretboard blank, I didn't appreciate how thick 1/4" would look on the relatively skinny tenor banjo neck. Next time I'll either spring for the 3/16" ebony from Stewmac, or see if I can find a 3/16" rosewood blank elsewhere.

Because the fingerboard is so thick, I decided to take a fair amount of additional wood off of the neck.

The nice thing about my shureform is that it removes wood quickly. The dangerous thing about my shureform is that it removes wood quickly.

Finally, I reached the point where it seemed like I really need the fingerboard in place before final shaping and sanding, so I took the plunge and cut the fingerboard to shape.

It looks like this will actually be an 18-fret tenor when all is said and done; my original calculations for the neck length were based on the position of the bridge on the 10 inch pot. It didn't occur to me to check the fret placement at that point, so it wasn't until I trimmed the fingerboard to size that I realized that there is just barely too little room for fret 19.

I'm not particularly upset... If I ever get proficient enough on tenor banjo that I actually need one with 19 frets, I will probably be happy to buy (or make) one.

Gluing the fingerboard on will be the scariest part of the operation so far. If the frets aren't absolutely perpendicular to the axis of the neck, playability will be seriously impaired.

For tonight, I will just bask in the satisfaction of how good the fretboard looks resting on the neck.

Tenor #1: Neck, Part VI


Tenor #1: 5th Fret
Originally uploaded by Usonian.
After gluing the inlay in place and patching the space with a mix of glue and rosewood dust, it was time to sand everything flush.

I started with 100 grit paper to get the worst of the excess glue off of the surface, then went to 150, 220, and finally down to steel wool.

It came out great, and I can't wait to do more on future instruments.

Monday, April 17, 2006

Tenor #1: Neck, Part V


Peghead - Back
Originally uploaded by Usonian.
I spent about an hour cleaning up the peghead tonight. I got the volute more or less under control, and my 1/4-sheet sander has gotten most of the bandsaw marks off of the back of the peghead (although it is by no means flat yet.)

Next time I'll decide definitively what kind of overlay I'm using before cutting out the neck, and I'll know the final thickness ahead of time.

The curve is not symmetrical, but it's not so far out of whack as to drive me crazy. The more I look at this photo, the more I can see I'll want to smooth out the curve on the left. I just need to make sure I don't get into the "little bit off on this side, little bit off on that side" game trying to even things up.

Sunday, April 16, 2006

Time

If I had to guess how much time I've put into this tenor banjo, it would not actually be very much compared to the number of weeks that have passed... maybe 15 hours altogether. Today was the first time in about a month that I've managed to find a number of consecutive hours to work on it, and I got a tremendous amount done.

Tenor #1: Neck, Part IV

I finally summoned the courage to cut into my pristine piece of rosewood. I built a small miter box last month, and it seems to have worked fairly well. I'll know better when the time comes to actually install the frets.

Eventually I expect I will invest in Stewart MacDonald's fret slotting saw. I love my Vaughn bear saw, but it didn't feel entirely rigid - and this is an operation where rigidity is definitely a plus.

Once the fret slots were cut, I decided to go ahead with the pre-cut inlays. Taking another tip from Siminoff's book I went with the white tempera technique, painting over the areas to be inlaid and then blacking in the areas to be cut out; with all the sawdust that will be created, the white makes it easier to see where you've already cut. When you're done, the tempera washes right off.

Routing the inlay chambers was wonderfully easy with the Dremel router attachment. For the points of the star I used a tiny engraving bit I purchased a couple of months ago - so small I had to purchase an additional 3/32" chuck for it. It's exciting to see how easy cutting the cavities was. When I get some mother of pearl blanks to play with, I'll probably find that cutting the stuff out is the trickier part.

Tenor #1: Rim, Part III

In the end I decided to use the full 2 inch width of veneer. In an attempt to avoid ironing directly against the edge of the drumhead, I first tried ironing the veneer agains a length of parchment paper. My theory was that the glue would melt without sticking, and I would be able to peel it up and apply it directly to the drum.

That might have worked if I had planned to apply the veneer in two lengths, but on my first try I went for the full 31.42 inch length. (Hey high school geometry slackers: π × the 10" diameter of the drum rounds up to 31.42 inches. Yes, you will use this stuff in real life.)

31 inches proved to be too long to manage with the parchment paper technique; the glue wouldn't have stayed hot long enough to iron the whole length at once, and there was no good way to apply it gradually. In the end I decided to iron directly against the outside of the drum, avoiding the staples and head material at the top 1/4 inch.

The only problem there was that the presence of the staples made the veneer want to go on in a very gradual spiral, since the surface wasn't perfectly flat. By the time I got halfway around the circumference of the drum, the edges were out of whack. I wound up cutting the veneer in half, so there will be two seams: one where the neck attaches, and one where the tailpiece attaches. Even so, the veneer didn't go on as smoothly as I would have liked. There are a few uneven spots where I'll have to go back and try and re-iron and smooth it down, but I don't know how well that will work.

Tenor #1: Neck, Part III

I had done a fair amount of shaping on the neck since the last photo, and I decided it was time to shape the peghead before continuing.

Taking a tip from Siminoff's book, I positioned the veneer and then drilled two small pilot holes outside of the "live" peghead area; after gluing the peghead, two nails in the pilot holes kept it from shifting when I applied clamps.

My little 9" benchtop bandsaw does a surprisingly capable job during shaping; I used a jig to hold the peghead at its 15 degree angle to the blade, and because I went with a simple peghead shape the cutting went quickly and without incident. More and more I find myself using the running blade to scrape small amounts of wood away laterally to smooth rough spots... eventually I'll need to experiment with a finer blade.

I was also able to thin the overall peghead thickness much closer to the final target of 9/16ths of an inch. My hand-cut overlay is not very graceful.

Monday, April 03, 2006

Tenor #1: Rim, Part II

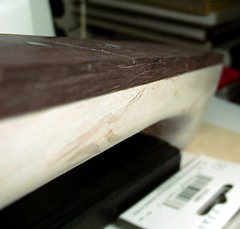
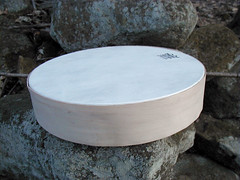
I've never been crazy about the plastic veneer that came on the Remo drum I'm using as the pot for this banjo, so when I came across some 2"
wide maple veneer this weekend I jumped right on it... $6.99 for a 96
inch roll at the Woodcraft store in West Springfield, Mass. It's the
iron-on adhesive type, which in hindsight might not have been the best
idea. (more on that below.)

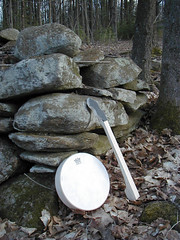
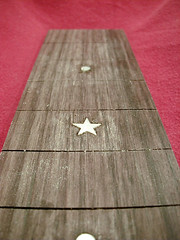
I was a little bit concerned about peeling the veneer off the drum,
not knowing exactly how the head is attached and whether I might
damage it somehow, but I needn't have worried... the tape around the
top and the veneer itself peeled right off, not even leaving any residue.

It turns out the head is just stapled on... very small staples very
close together all the way around the top.

At this point it occurred to me that pressing a hot iron against the
drum head material is probably not such a great idea... I expect it
would melt and/or shrivel. So, I will either need to trim the veneer
down a bit and find something else to cover the staples, or leave the
veneer at 2 inches wide and just not iron it at the top.