Build Notes

Name:
Location: Dunwich, MA

Sunday, March 19, 2006

Tenor #1: Neck, Part II

At the outset of this project, I had been planning to use black formica for the fingerboard and peghead overlay. Eventually I decided to spring for a rosewood fingerboard, but I had to draw the line there... I couldn't quite talk myself into spending the money for an ebony peghead overlay too.

I don't want to use formica next to a nice rosewood fingerboard, though, so I took a tip from the Banjo Makers group and bought myself a bottle of black shoe leather dye at the drugstore. I managed to fashion a thin piece of maple about 3" x 7" x ~1/8" from a scrap of 1x3. I was able to scrape it thin by dragging it diagonally across the bandsaw blade, and by the time I sanded all of the saw marks smooth it looked pretty good. It is not thickness sanded and it's certainly not the 3/32" you can get from Stewmac, but I think it will work. The leather dye works nicely, darkening the wood without hiding the grain.

The tricky part will be removing the extra wood from the peghead itself; the faux ebony overlay will add noticeable depth to it.

Saturday, March 18, 2006

Tenor #1: Dowel Stick, Part II

I decided to re-make the dowel stick in maple... The mystery dowel wood was just too soft, and the more I looked at it the more I noticed that I had sanded a slight curve into the taper.

It was definitely the right decision... I still have a bit more sanding to do, but the maple feels infinitely more sturdy than the other wood, and it will finish consistently with the neck.

Observations

While there is no substitute for real live experience, the internet is a remarkable means of knowledge transfer... When I asked my original question about dowel stick dimensions to the Yahoo! Banjo makers group I received five replies within a couple of days, including one from Dave Ball, whose three-part banjo making series on DIY Network's Handmade Music got me off my behind and working on the neck of my dormant first project last fall. Twenty years ago it would have been a lot harder to find an answer.

Wednesday, March 15, 2006

Tenor #1: Rim, Part I

I decided to start on the square hole through the hand drum, where the dowel stick will pass through at the neck joint.

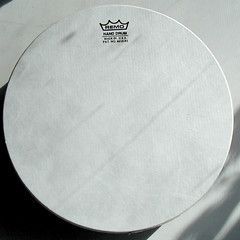
Gaffe number one: I drilled the hole on the opposite side of the rim than I had originally intended; I wanted the Remo graphic to be at the tailpiece end of the instrument; it would have been a little less prominent, and it would also have placed the seam of the cheesy fake walnut veneer around the outside of the drum at the neck joint, hiding it completely. As the saying goes, measure twice, cut once.

I'm not all that upset about it... it won't affect tone in any way, and I'm probably the only person that will notice (or care) about the position of the logo.

I drilled a small pilot hole, then drilled a larger, 1/2" hole. The dowel stick will be about 3/4" at the wide end, so I wanted to be conservative. Next I tried to cut the corners of the hole with a coping saw, but I didn't feel like I had enough control that way. I'll probably finish the hole with files.

Upon drilling through it, I discovered that the drum shell is made of very dense cardboard, like the stuff you usually find in rolls of carpeting. I wonder how Remo mounts the head on these drums.

Sunday, March 12, 2006

Tenor #1: Dowel Stick, Part I

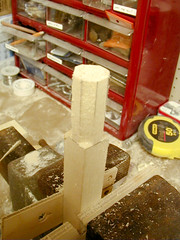
The daunting thing about a dowel stick when you don't have a lathe is the "dowel" part. Fortunately, I have a new favorite tool that was up to the task at hand:

Vaughn Mini-Bear Saw

This Vaughn Mini-Bear Saw is the first Japanese-style pull saw I've ever used, and it certainly won't be the last; I've never used a hand-saw that cut with this kind of precision, or with such a narrow kerf. Here I used it to cut the corners off of the end of the dowel, turning it into an octagon:

Poor Man's Lathe

Sandpaper did the rest. Towards the end I was able to use a shoe-shine action applied from several angles to even out the curves. It's certainly not machine-perfect, but I think it will work.

I contemplated trying to use my balky block-plane to taper the dowel stick, but in the end decided to use the band saw, cutting outside the lines to leave myself some sanding room. I was surprised how well the taper from 3/4 to 1/2" came out:

Dowel Stick

Notes


  • I don't know what dimensions are typical for dowel sticks; 1/2 inch at the narrow end seems a little bit small, and it has me a bit worried about splitting when the end bolt is installed. I will, of course drill a pilot hole before actually screwing the bolt in, but with the wood being somewhat soft I don't know if it will be strong enough.
  • Home Depot was being generous when they labeled this square dowel as "hard wood". Harder than pine, maybe, but not much. I'm not sure what kind of wood it is. I should probably repeat this exercise with a piece of maple, but I know that the rounding and tapering will take quite a bit longer if I do.
  • I'm also thinking about a ferrule. If I can track one down locally, it would certainly inform the actual dimension of the dowel stick at the narrow end. If not, Stewart MacDonald will probably tell me if I inquire via email.

Followup

I posed the "standard dowel stick" question to the Yahoo! Banjomakers group, and it turns out that Vega dowel sticks tended to taper from 3/4" to 1/2", which is as good a standard as any. I was also reassured that it should be strong enough for the end bold as long as the hole is centered and true, although I didn't mention I was using mystery wood; the question at this point is whether or not to remake the thing out of maple. I'll have to sleep on it.

Tenor #1: Neck, Part I

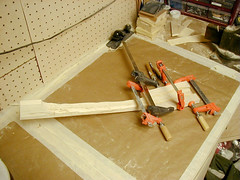
Rough Cut Neck

I cut out the neck from two pieces of maple 1x3 that I glued up last night; since the tenor neck is a relatively skinny with only 4 strings, I thought I'd be able to get away with a 1.5" wide blank... that was cutting it pretty close, but I think it will be OK in the end. Here I've just glued the peghead ears on (much wider than necessary, but it was easier to just cut another scrap of 1x3 in half than into thirds.)

Observations: I need a jointer plane.

Saturday, March 11, 2006

Tenor #1: Simple Beginnings


Banjo Egg
Originally uploaded by Usonian.
At the time of this writing, I call myself an aspiring luthier in the 'About Me' section at the top of this page.

I began to take a fairly serious interest in building instruments as a hobby in late 2002, a few months after acquiring my first banjo.

I've spent the intervening years buying books, tools, and materials, and bookmarking other luthiers' web sites. Over the last year I've done some work on a short scale banjo, but keep running up against the realities of how expensive a banjo actually is to put together... and because some of my work is admittedly fairly rough I've been reluctant to spend very much more money for nickel-plated hardware on a learning project.

Enter this 10 inch Remo hand drum that I picked up last month at Downtown Sounds in Northampton, Massachusetts... for about twenty dollars, I've got a complete low-brow pot assembly. No need to buy 12+ tension hook/hex nut/shoe bracket assemblies for $3-4 apiece, no need to buy a $35 tension hoop, or coordinator rods. (I'm not even going to touch the subject of tone rings. If you care about tone rings, you probably stopped reading as soon I announced my intent to use a pre-tuned drum for a pot.)

So I've decided to build myself a 19 fret, open back tenor banjo, concentrating on the neck and getting my feet wet with installing frets and some pre-cut inlay.

In an attempt to solidify my own commitment to this hobby and (I hope) eventual business, I'm splitting this weblog off of my main site.